
Streamlining communication can save hours of labor and prevent mistakes. Sending certain messages at pre-defined stages of communication not only keeps the customer and agents informed about specific events, but it can also aid your agents by programmatically doing automated updates to the customer.
The flexible OTRS is an industry leader in email communication and offers you complete control of notifications based on any event in your system.
Use this screen to add ticket notifications to the system. In a fresh OTRS installation several ticket notifications are already added by default. The ticket notification management screen is available in the Ticket Notifications module of the Communication & Notifications group.
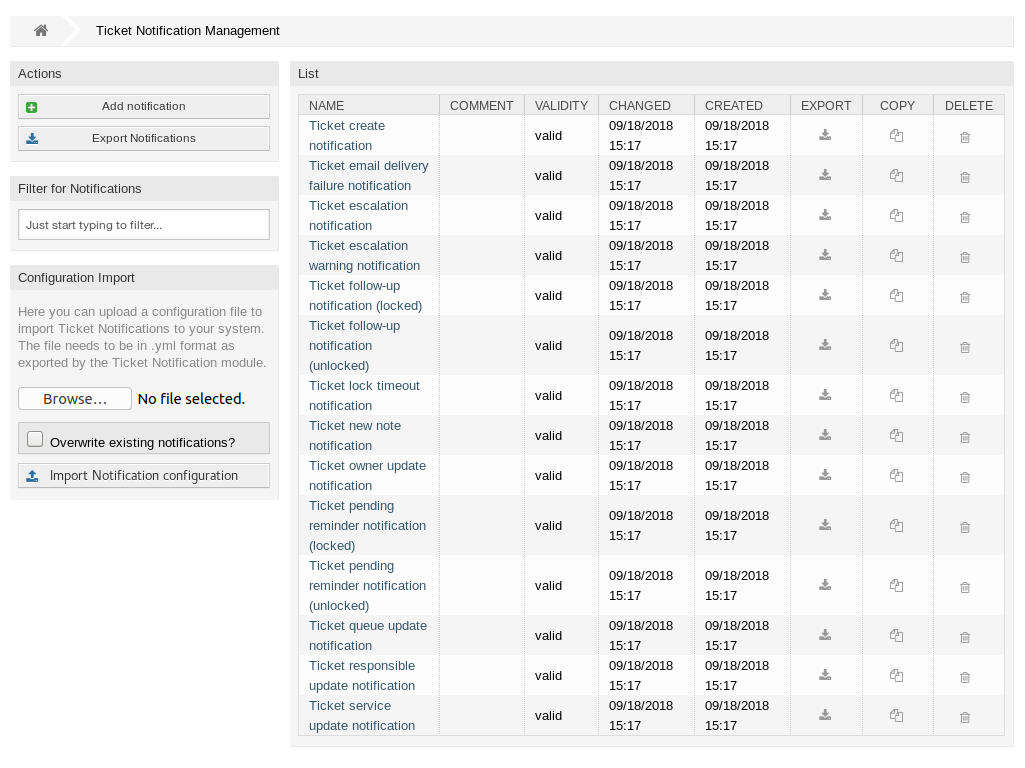
Manage Ticket Notifications
To add a ticket notification:
-
Click on the Add Notification button in the left sidebar.
-
Fill in the required fields as explained in Ticket Notification Settings.
-
Click on the Save button.
To edit a ticket notification:
-
Click on a ticket notification in the list of ticket notifications.
-
Modify the fields as explained in Ticket Notification Settings.
-
Click on the Save or Save and finish button.
To delete a ticket notification:
-
Click on the trash icon in the list of ticket notifications.
-
Click on the Confirm button.

To export all ticket notifications:
-
Click on the Export Notifications button in the left sidebar.
-
Choose a location in your computer to save the
Export_Notification.ymlfile.
Warning
Certain settings are exported as numeric IDs and will break when importing to a system where these settings do not appear or reference other named items.
To import ticket notifications:
-
Click on the Browse… button in the left sidebar.
-
Select a previously exported
.ymlfile. -
Click on the Overwrite existing notifications? checkbox, if you would like to overwrite the existing notifications.
-
Click on the Import Notification configuration button.
Sending Articles Created in the External Interface as Emails
To activate sending emails to custom contact field customer users:
-
Click on the Add Notification button in the left sidebar.
-
Fill in the required fields.
-
In the Add Notification section, choose a name and set it in the Name field.
-
In the Events section, select ArticleCreate.
-
In the Article Filter section:
-
Set agent and customer in the Article Sender Type field.
-
Set Visible to customer in the Customer visibility field.
-
Select Email in the Communication channel field.
-
Switch Include attachments to notification to Yes.
-
-
In the Recipients section set a dynamic contact field in the Send to field.
-
In the Notification Methods section:
-
Make sure, that the Email method is enabled.
Note
Joined notifications are only sent by Email.
-
Select the checkbox in the Article visible to customer field.
-
-
In the Notification Text section:
-
If you want the contacts of the custom contact field to get the title of the article as mail subject add
<OTRS_CUSTOMER_SUBJECT>into the Subject field. -
If you want to send the article body as mail body add
<OTRS_CUSTOMER_BODY>into the Text field.
-
-
Click on the Save button.
Ticket Notification Settings
The following settings are available when adding or editing this resource. The fields marked with an asterisk are mandatory.
See also
For an example, see a default ticket notification which is included in a fresh OTRS installation.
Basic Ticket Notification Settings
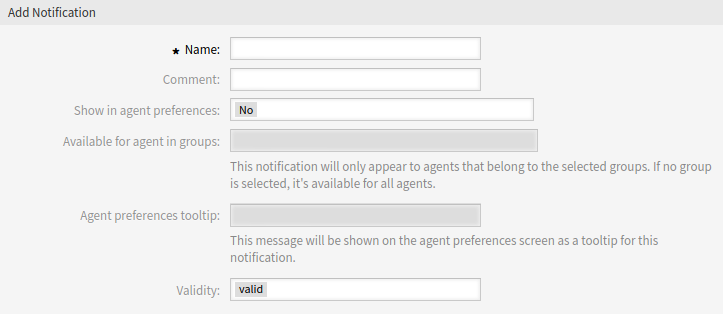
- Name *
-
The name of this resource. Any type of characters can be entered to this field including uppercase letters and spaces. The name will be displayed in the overview table.
- Comment
-
Add additional information to this resource. It is recommended to always fill this field as a description of the resource with a full sentence for better clarity, because the comment will be also displayed in the overview table.
- Show in agent preferences
-
Define how the notification should be displayed in agent preferences. The following options are available:
- No
-
The notification won’t be displayed in agent preferences. The notification is sent to all appropriate agents by the defined method.
- Yes
-
The notification will be displayed in agent preferences for selection. The agents may opt-in or opt-out.
- Yes, but require at least one active notification method.
-
The notification will be displayed in agent preferences, but require at least one active notification method. This is annotated by an asterisk next to the name.
- Available for agent in groups
-
The notification will only appear to agents that belong to the selected groups. If no group is selected, it is available for all agents.
- Agent preferences tooltip
-
This message will be shown on the agent preferences screen as a tooltip for this notification.
- Validity *
-
Set the validity of this resource. Each resource can be used in OTRS only, if this field is set to valid. Setting this field to invalid or invalid-temporarily will disable the use of the resource.
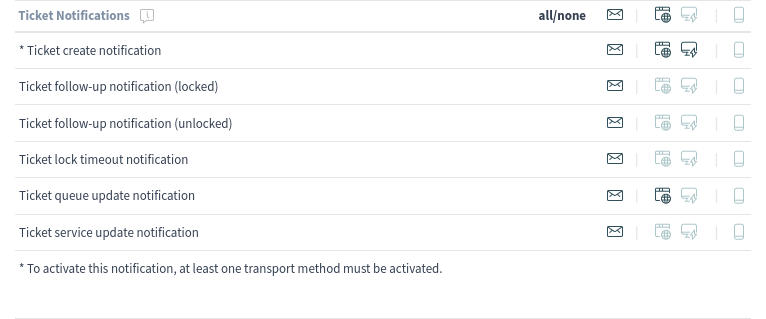
Events

- Event
-
Here you can choose which events will trigger this notification. An additional ticket filter can be applied below to only send for tickets with certain criteria.
Ticket Filter [1]
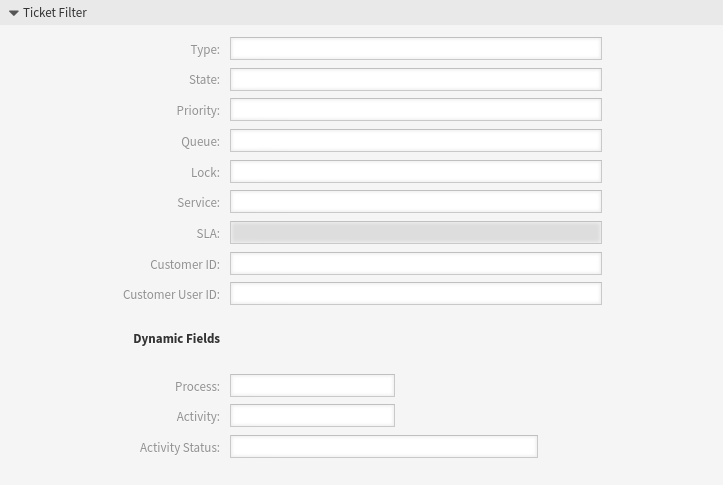
This widget can optionally be used to narrow the list of tickets by matching configured values:
Note
The values in this list can grow as your system grows. The more Dynamic Fields are and features you have in your system, the longer the list will be.
- Type
-
Filter for a type of the ticket.
Note
This field is displayed only if the
Ticket::Typesystem configuration setting is enabled and Types are added. - State
-
Filter for a state of the ticket.
- Priority
-
Filter for a priority of the ticket.
- Queue
-
Filter for a queue in which the ticket is located.
- Lock
-
Filter for a lock state of the ticket.
- Service
-
Filter for a service of the ticket.
Note
This field is displayed only if the
Ticket::Servicesystem configuration setting is enabled and Services are added. - SLA
-
Filter for a SLA of the ticket.
Note
This field is displayed only if the
Ticket::Servicesystem configuration setting is enabled and Service Level Agreements are added. - Customer ID
-
Filter for a customer ID of the ticket.
- Customer User ID
-
Filter for a customer user ID of the ticket.
- Dynamic Fields
-
Filter for some dynamic fields added to the system. For the complete list of dynamic fields see the Dynamic Fields chapter.
Article Filter [1]
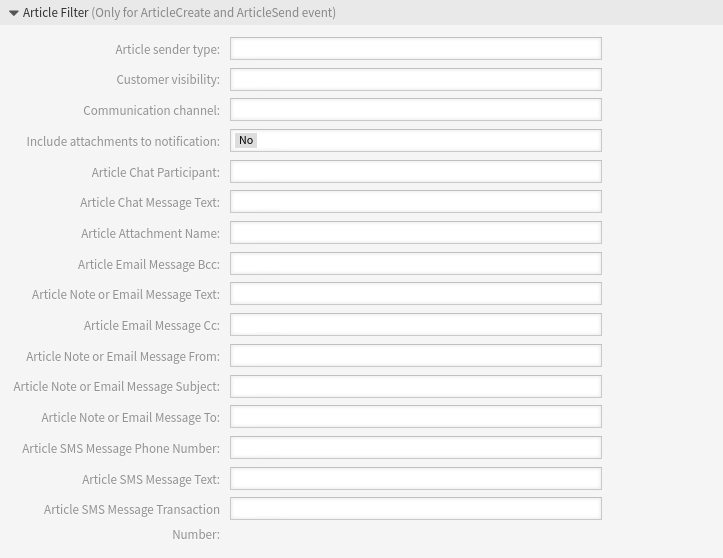
Note
This widget works only if ArticleCreate or ArticleSend is selected in the Events widget.
ArticleSend is the default for Email communication channel and ArticleCreate is the default for all other channels. While ArticleCreate can be specified for all communication channels, ArticleSend is only allowed for Email communication channel and only if all sender or recipient fields are invalid.
- Article sender type
-
Filter for the sender type of the ticket. Possible values are agent, system or customer.
- Customer visibility
-
Filter for the customer visibility. Possible values are Invisible to customer or Visible to customer.
- Communication channel
-
Filter for the communication channel. Possible values are Chat, Email, OTRS, Phone or SMS.
- Include attachments to notification
-
If Yes is selected, attachments will be included to notification. Selecting No will not use this feature.
- Article Chat Participant
-
Filter for chat participants.
- Article Chat Message Text
-
Filter for chat message text.
- Article Attachment Name
-
Filter for attachment name.
- Article Email Message Bcc
-
Filter for blind carbon copy field.
- Article Note or Email Message Text
-
Filter for body text.
- Article Email Message Cc
-
Filter for carbon copy field.
- Article Note or Email Message From
-
Filter for the sender field.
- Article Note or Email Message Subject
-
Filter for the subject field.
- Article Note or Email Message To
-
Filter for the main recipients field.
- Article SMS Message Phone Number
-
Filter for an SMS phone number.
- Article SMS Message Text
-
Filter for the SMS text.
- Article SMS Message Transaction Number
-
Filter for an SMS transaction number.
Ticket Notification Recipients

- Send to
-
Select which agents should receive the notifications. Possible values are:
-
Agent who created the ticket
-
Agent who is responsible for the ticket
-
Agent who owns the ticket
-
All agents subscribed to both the ticket’s queue and service
-
All agents subscribed to the ticket’s queue
-
All agents subscribed to the ticket’s service
-
All agents watching the ticket
-
All agents who focus on the owner
-
All agents who focus on the priority
-
All agents who focus on the queue
-
All agents who focus on the responsible
-
All agents who focus on the service
-
All agents who focus on the SLA
-
All agents who focus on the state
-
All agents who focus on the type
-
All agents who focus on the value
-
All agents with write permission for the ticket
-
All recipients of the first article
-
All recipients of the last article
-
Customer user of the ticket
See also
To be able to use all options in focus topic settings, you need to enable the following system configuration options:
-
AgentPersonalPreference###FocusTopics::Owner -
AgentPersonalPreference###FocusTopics::Priority -
AgentPersonalPreference###FocusTopics::Queue -
AgentPersonalPreference###FocusTopics::Responsible -
AgentPersonalPreference###FocusTopics::Service -
AgentPersonalPreference###FocusTopics::SLA -
AgentPersonalPreference###FocusTopics::State -
AgentPersonalPreference###FocusTopics::Type -
AgentPersonalPreference###FocusTopics::DynamicFields -
Ticket::Responsible -
Ticket::Service -
Ticket::Type
-
- Send to these agents
-
One or more agents can be selected who should receive the notifications.
- Send to all group members (agents only)
-
One or more groups can be selected whom agents should receive the notifications.
- Send to all role members
-
One or more roles can be selected whom agents should receive the notifications.
- Send on out of office
-
If this option is checked, the notification will be sent even if the agent is currently out of office.
- Once per day
-
Notify users just once per day about a single ticket using a selected transport. If this is the first notification about a ticket, then the notification will be sent. If a notification was already sent before and this option is checked, the OTRS daemon will check the time the last notification was sent. If there was no notification sent in the last 24 hours, the notification will be sent again.
Note
The notifications respect the permissions of the agent. Notifications are sent to agents only if the agent has at least read permissions for the ticket in that moment in time when the notification is triggered.
Ticket Notification Methods
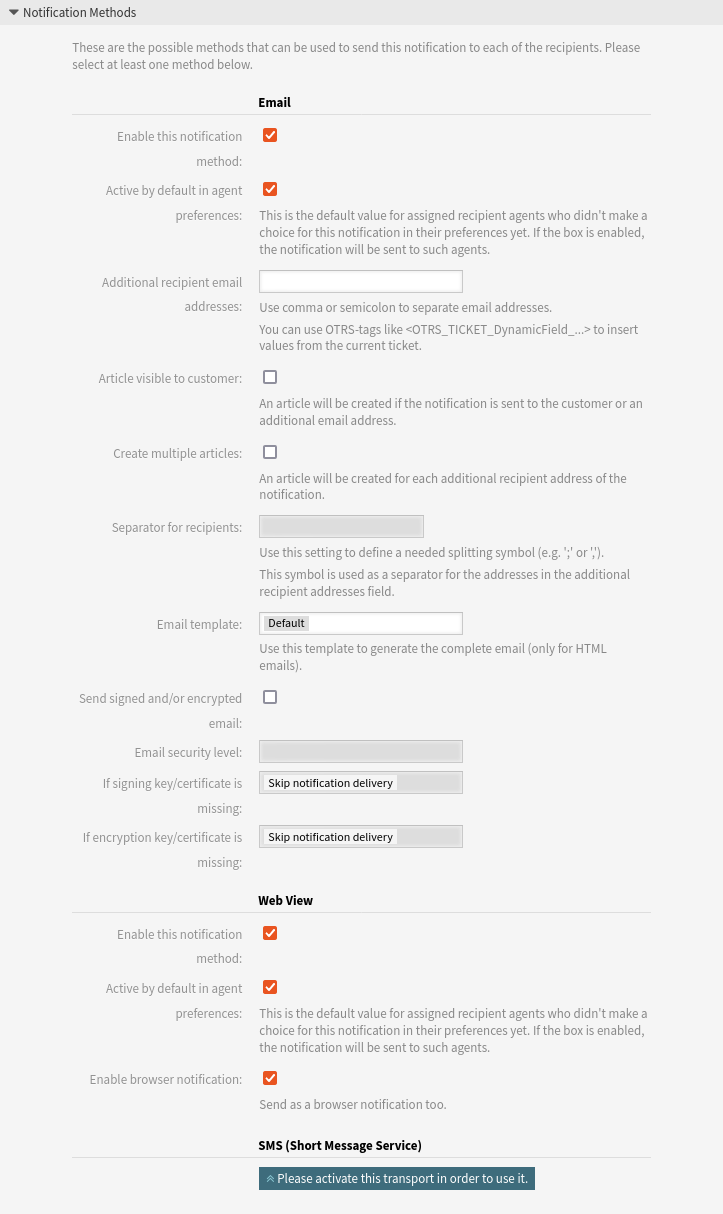
- Enable this notification method
-
Enable or disable this notification method. A notification method can be email, web view with browser notification support or SMS.
- Enable browser notification
-
This option is available for web view only. If checked, the system sends a browser notification, too. Web view notifications will be displayed in the notifications area of the agent interface while a browser notification is a native browser notification which needs to be enabled in the web browser at first time.
Note
To use the SMS notification method, Cloud Services need to be enabled.
- Active by default in agent preferences
-
This is the default value for assigned recipient agents who didn’t make a choice for this notification in their preferences yet. If the box is enabled, the notification will be sent to such agents.
Note
This field is displayed only if Yes is selected in the Show in agent preferences setting above.
- Additional recipient email addresses
-
Additional recipients can be added here. Use comma or semicolon to separate the email addresses.
- Article visible to customer
-
An article will be created if the notification is sent to the customer or an additional email address.
- Create multiple articles
-
An article will be created for each additional recipient address of the notification.
- Separator for recipients
-
This symbol is used as a separator for the addresses in the additional recipient addresses field.
- Email template
-
Select which email template should be used for the notification.
Note
Additional email templates can be added by placing a
.ttfile into the folder<OTRS_Home>/Kernel/Output/HTML/Templates/Standard/NotificationEvent/Email/. See the existing email templates for an example. - Send signed and/or encrypted email
-
Checking this option will encrypt the notification email.
Note
To use this feature, PGP Keys or S/MIME Certificates need to be enabled.
- Email security level
-
If Enable email security is checked, then this setting is activated. The following options are available:
- PGP sign only
-
Sign only the notification email with PGP key. If no PGP keys have been added to the system, this option is not visible.
- PGP encrypt only
-
Encrypt only the notification email with PGP key. If no PGP keys have been added to the system, this option is not visible.
- PGP sign and encrypt
-
Sign and encrypt the notification email with PGP key. If no PGP keys have been added to the system, this option is not visible.
- S/MIME sign only
-
Sign only the notification email with S/MIME certificate. If no S/MIME certificates have been added to the system, this option is not visible.
- S/MIME encrypt only
-
Encrypt only the notification email with S/MIME certificate. If no S/MIME certificates have been added to the system, this option is not visible.
- S/MIME sign and encrypt
-
Sign and encrypt the notification email with S/MIME certificate. If no S/MIME certificates have been added to the system, this option is not visible.
Note
To use this feature, PGP Keys or S/MIME Certificates need to be enabled.
- If signing key/certificate is missing
-
Select the method, that should be used if signing key or certificate is missing.
- If encryption key/certificate is missing:
-
Select the method, that should be used if encryption key or certificate is missing.
Notification Text
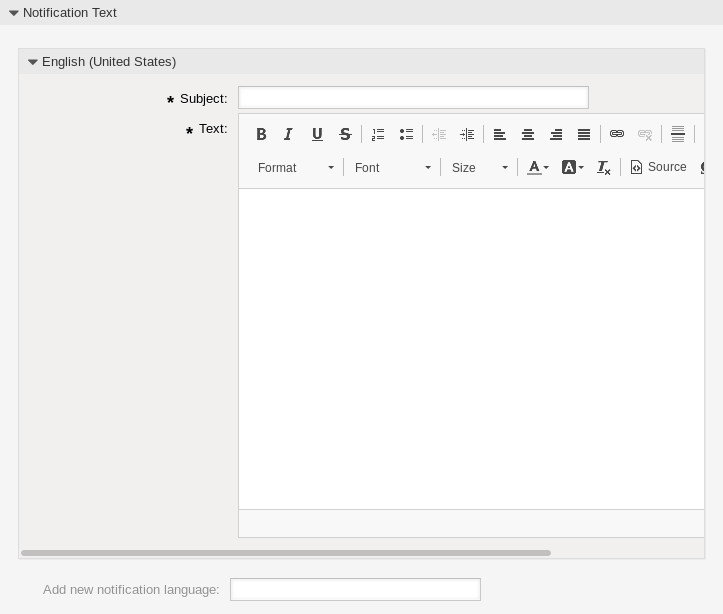
The main content of a notification can be added for each languages with localized subject and body text. It is also possible to define static text content mixed with OTRS smart tags.
- Subject *
-
The localized subject for a specific language.
- Text *
-
The localized body text for a specific language.
- Add new notification language
-
Select which languages should be added to create localized notifications. The language of the customer or agent will be used as found in the customer and agent preferences. Secondarily, the system default language will be chosen. The fall back will always be English.
Warning
Deleting a language from the DefaultUsedLanguages setting that already has a notification text here will make the notification text unusable. If a language is not present or enabled on the system, the corresponding notification text could be deleted if it is not needed anymore.
Ticket Notification Variables
Using variables in the text makes it possible to personalize messages. Variables, known as OTRS tags, are replaced by OTRS when generating the message. Find a list of available tags stems for this resource at the bottom of both add and edit screens.
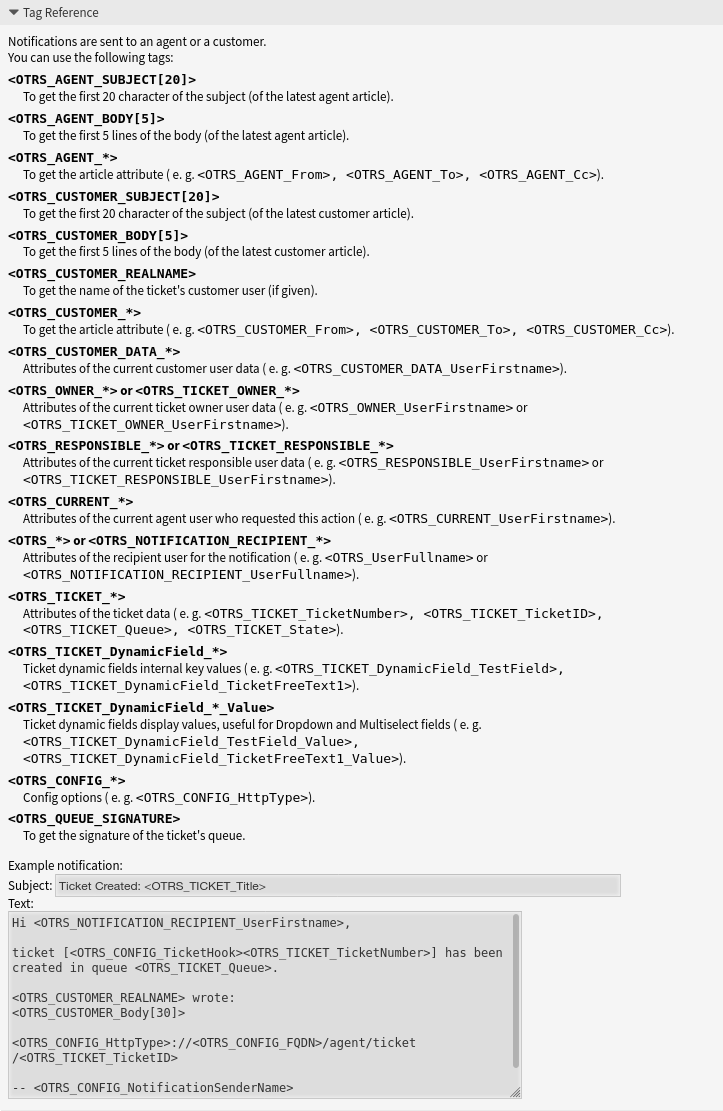
For example, the variable <OTRS_TICKET_TicketNumber> expands to the ticket number allowing a template to include something like the following.
Ticket#<OTRS_TICKET_TicketNumber>
This tag expands, for example to:
Ticket#2018101042000012
The values of the following variables are translated based on the chosen language of the customer user.
<OTRS_TICKET_Type>
<OTRS_TICKET_State>
<OTRS_TICKET_StateType>
<OTRS_TICKET_Lock>
<OTRS_TICKET_Priority>
If the language is not supported the default language is applied.