Customers in OTRS are organizations, companies or authorities. The real users are called Customer Users. A fresh OTRS installation contains no customers by default.
Create Customer
Customers can be added by using the links in the main menu and in the action menu.
To add a customer:
-
Choose a data source.

-
Fill in the required fields.
-
Click on the Create button.

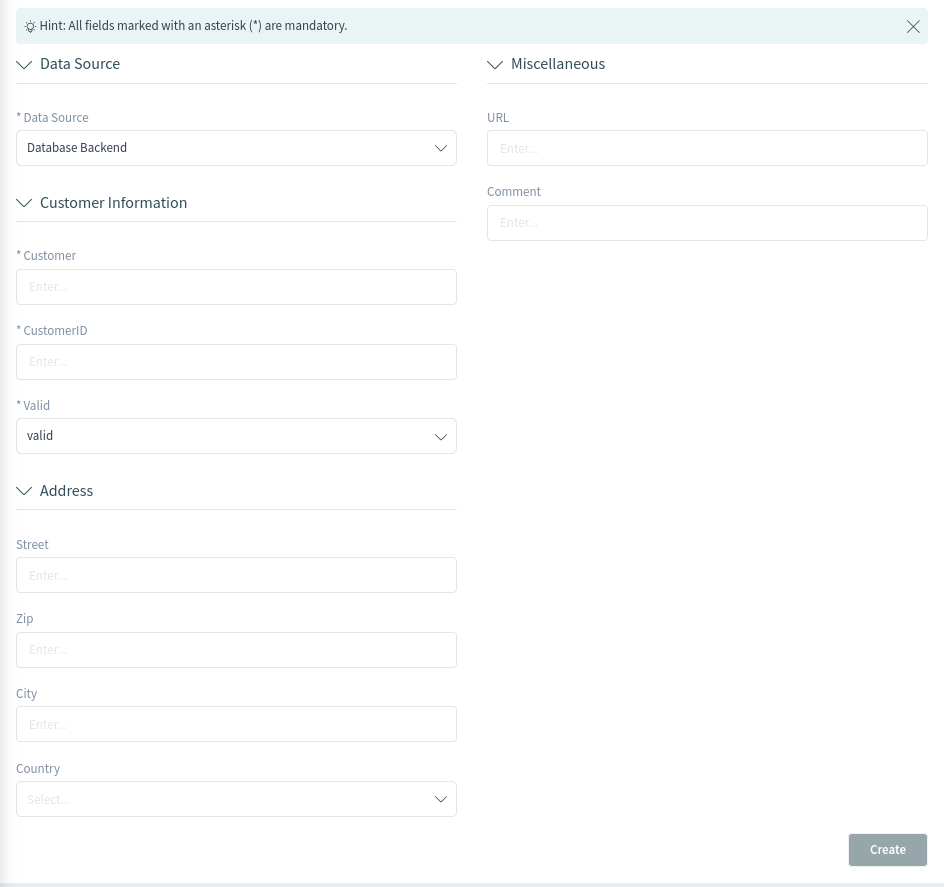
The following settings are available when adding a customer. The fields marked with an asterisk are mandatory.
- Data Source *
-
In this section, the data source for storing customers can be selected. Multiple data sources are supported, including external data sources like LDAP.
Note
External data sources can be read-only.
- Customer Information
-
In this section, the full name and the internal name of the customer can be added.
- Customer *
-
The full name of the customer (usually the same as the company name). Any type of characters can be entered into this field, including uppercase letters and spaces.
- CustomerID *
-
The internal name of the customer. Should contain only letters, numbers and some special characters.
- Valid *
-
Set the validity of this customer. Customers can only be used in OTRS if this field is set to valid. Setting this field to invalid or invalid-temporarily will disable the use of the customer.
- Address
-
In this section, address information about the customer can be added.
- Street
-
The street name of the customer.
- Zip
-
The zip code of the customer.
- City
-
The city of the customer’s headquarters.
- Country *
-
The country of the customer. Choose a country from the list.
- Miscellaneous
-
In this section, additional information about the customer can be added.
- URL
-
The web page or other URL of the customer.
- Comment
-
Add additional information to this customer. It is recommended that you always fill this field with full sentences for better clarity.
Customer List
Use this screen to browse through the valid customers. The customer list is available from the organizer sidebar.

The customer list has no bulk actions. Clicking on the pencil icon in the column Edit opens the customer edit screen.
It is possible to preview a customer’s business card by hovering the mouse over the customer ID or name of a customer. Clicking on a customer in the list opens the customer detail view.
Customer Detail View
Use this screen to see the details of a customer. The customer detail view is available when you select a customer from a customer list.
Customer Detail View Widgets
Like other business object detail views, the customer detail view is also highly customizable. Some of the following widgets are displayed with the default installation, but others have to be added in the screen configuration.
- Customer Information Widget
-
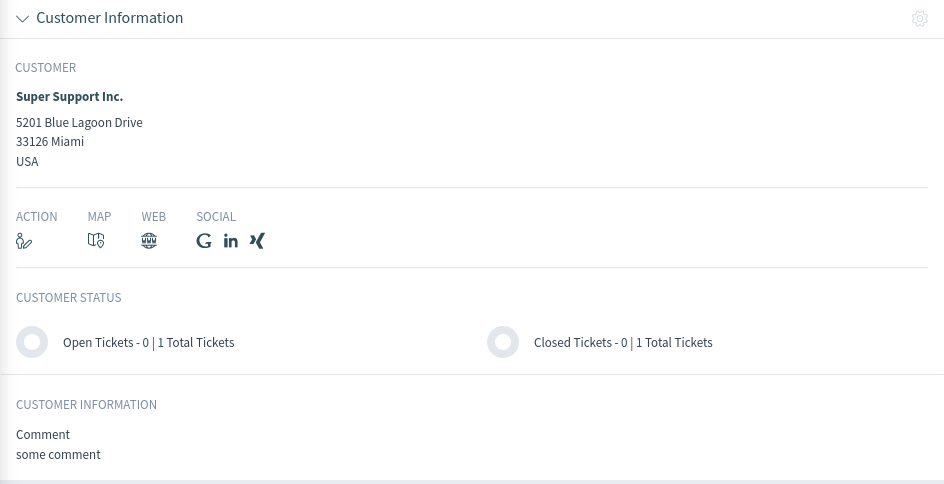
This widget shows information about the customer.

The card shows the number of open and closed tickets related to this customer. From the Action section, it is possible to edit the customer. The Map section contains a link to view the customer address on a configured map. The URL in the Web section points to the customer’s website. The Social section contains links to some social media pages or search engines that are related to the customer.
- Escalations Widget
-
This widget lists the customer’s escalated tickets. Escalated tickets are tickets that remain open after the time that was set by the customer’s service level agreement; therefore the ticket needs to be worked on immediately.
Clicking on a ticket opens the ticket detail view.

- Reminders Widget
-
This widget lists the customer’s pending tickets. Pending tickets are set for work at a later time by the agent, and the reminder time is going to expire soon.
Clicking on a ticket opens the ticket detail view.

- Open Tickets Widget
-
This widget lists the customer’s open tickets. Open tickets represent the current work to be done by the agent.
Clicking on a ticket opens the ticket detail view.

- Customer Users Widget
-
This widget is used to list all customer users that belong to the customer. It is possible to edit the customer user and create tickets directly from the widget.
It is possible to preview a customer user’s business card by hovering the mouse over the username or the name of a customer user. Clicking on a customer user in the list opens the customer user detail view.

- Ticket List Widget
-
This widget lists all the tickets of the customer.
Clicking on a ticket opens the ticket detail view.

Customer Detail View Actions
The following actions are available in the customer detail view.

- Organization
-
This column groups the following actions together:
- Edit Customer
-
This action allows the agent to edit the customer.
- People
-
This column groups the following actions together:
- Add Customer User
-
This action opens the Create Customer User screen in order to add a customer user to this customer.

