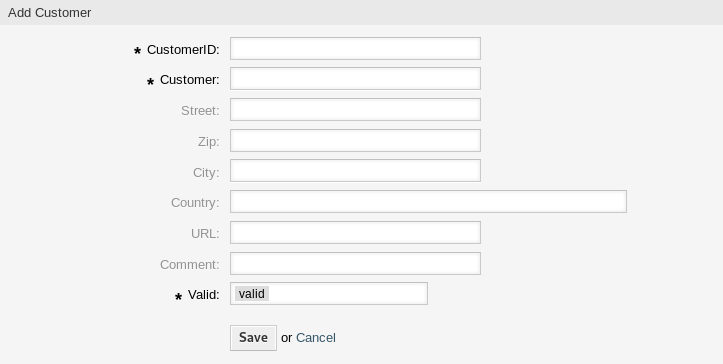
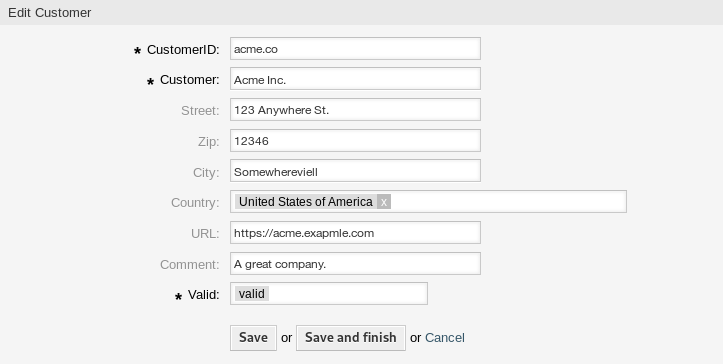
Use this screen to add customer companies to the system. A fresh OTRS installation contains no customers by default. The customer management screen is available in the Customers module of the Users, Groups & Roles group.

Manage Customers
Note
Adding or editing a customer is possible only by using database back end. Using external directory services like LDAP will disable the customer management functionality.
To add a customer:
-
Click on the Add Customer button in the left sidebar.
-
Fill in the required fields.
-
Click on the Save button.

Warning
Customers can not be deleted from the system. They can only be deactivated by setting the Validity option to invalid or invalid-temporarily.
To edit a customer:
-
Click on a customer in the list of customers.
-
Modify the fields.
-
Click on the Save or Save and finish button.

To find a customer:
-
Enter a search term to the search box in the left sidebar.
-
Click on the magnifying glass icon in the right part of the field or hit an
Enter.
Note
If several customers are added to the system, use the search box to find a particular customer. Only the first 1000 customers are listed by default.
Customer Settings
The following settings are available when adding or editing this resource. The fields marked with an asterisk are mandatory.
- Customer ID *
-
The internal name of the customer. Should contain only letters, numbers and some special characters.
- Customer *
-
The name of this resource. Any type of characters can be entered to this field including uppercase letters and spaces. The name will be displayed in the overview table.
- Street
-
The street name of the customer.
- Zip
-
The zip code of the customer.
- City
-
The headquarter city of the customer.
- Country
-
The country of the customer. Choose a country from the list.
- URL
-
The web page or other URL of the customer.
- Comment
-
Add additional information to this resource. It is recommended to always fill this field as a description of the resource with a full sentence for better clarity, because the comment will be also displayed in the overview table.
- Validity *
-
Set the validity of this resource. Each resource can be used in OTRS only, if this field is set to valid. Setting this field to invalid or invalid-temporarily will disable the use of the resource.
Customer Back Ends
The system works with many customer data attributes such as customer ID, customer name, location information etc. These attributes are displayed in the agent interface and can be displayed in the external interface.
Customer data used or displayed within the system is highly customizable. The customer ID is always needed.
The administrator interface does not support the configuration of external back ends. Administrators need to edit the file Kernel/Config.pm by copying and pasting code snippets from Kernel/Config/Defaults.pm manually in case of using On-Premise system.
If you already have another customer back end (e.g. SAP), it is possible to write a module that uses it.
Warning
Do not modify the file Kernel/Config/Defaults.pm, it will be overwritten after upgrading the system! Copy and paste the code snippets into Kernel/Config.pm instead.
Note
This feature is only available to On-Premise customers. If you are a Managed customer, this feature is taken care of by the Customer Solutions Team in OTRS. Please contact us via support@otrs.com or in the OTRS Portal.
Customer Back End – Database
The default back end for customers is the OTRS database. With this back end, all customer data can be edited via the administrator interface.
    $Self->{CustomerCompany} = {
        Name   => Translatable('Database Backend'),
        Module => 'Kernel::System::CustomerCompany::DB',
        Params => {
            # if you want to use an external database, add the
            # required settings
#            DSN  => 'DBI:odbc:yourdsn',
#            Type => 'mssql', # only for ODBC connections
#            DSN => 'DBI:mysql:database=customerdb;host=customerdbhost',
#            User => '',
#            Password => '',
            Table => 'customer_company',
#            ForeignDB => 0,    # set this to 1 if your table does not have create_time, create_by, change_time and change_by fields

            # CaseSensitive defines if the data storage of your DBMS is case sensitive and will be
            # preconfigured within the database driver by default.
            # If the collation of your data storage differs from the default settings,
            # you can set the current behavior ( either 1 = CaseSensitive or 0 = CaseINSensitive )
            # to fit your environment.
            #
#            CaseSensitive => 0,

            # SearchCaseSensitive will control if the searches within the data storage are performed
            # case sensitively (if possible) or not. Change this option to 1, if you want to search case sensitive.
            # This can improve the performance dramatically on large databases.
            SearchCaseSensitive => 0,
        },

        # company unique id
        CustomerCompanyKey             => 'customer_id',
        CustomerCompanyValid           => 'valid_id',
        CustomerCompanyListFields      => [ 'customer_id', 'name' ],
        CustomerCompanySearchFields    => [ 'customer_id', 'name' ],
        CustomerCompanySearchPrefix    => '*',
        CustomerCompanySearchSuffix    => '*',
        CustomerCompanySearchListLimit => 250,
        CacheTTL                       => 60 * 60 * 24, # use 0 to turn off cache

        Map => [
            # Info about dynamic fields:
            #
            # Dynamic Fields of type CustomerCompany can be used within the mapping (see example below).
            # The given storage (third column) then can also be used within the following configurations (see above):
            # CustomerCompanySearchFields, CustomerCompanyListFields
            #
            # Note that the columns 'frontend' and 'readonly' will be ignored for dynamic fields.

            # var, frontend, storage, shown (1=always,2=lite), required, storage-type, http-link, readonly
            [ 'CustomerID',             Translatable('CustomerID'), 'customer_id', 0, 1, 'var', '', 0 ],
            [ 'CustomerCompanyName',    Translatable('Customer'),   'name',        1, 1, 'var', '', 0 ],
            [ 'CustomerCompanyStreet',  Translatable('Street'),     'street',      1, 0, 'var', '', 0 ],
            [ 'CustomerCompanyZIP',     Translatable('Zip'),        'zip',         1, 0, 'var', '', 0 ],
            [ 'CustomerCompanyCity',    Translatable('City'),       'city',        1, 0, 'var', '', 0 ],
            [ 'CustomerCompanyCountry', Translatable('Country'),    'country',     1, 0, 'var', '', 0 ],
            [ 'CustomerCompanyURL',     Translatable('URL'),        'url',         1, 0, 'var', '[% Data.CustomerCompanyURL | html %]', 0 ],
            [ 'CustomerCompanyComment', Translatable('Comment'),    'comments',    1, 0, 'var', '', 0 ],
            [ 'ValidID',                Translatable('Valid'),      'valid_id',    0, 1, 'int', '', 0 ],

            # Dynamic field example
#            [ 'DynamicField_Name_Y', undef, 'Name_Y', 0, 0, 'dynamic_field', undef, 0 ],
        ],
    };
If you want to customize the customer data, change the columns or add new ones to the customer_company table in the database.
For example, to add a new field for VAT number:
-
Add a new column
vatto tablecustomer_company.MySQL or MariaDB:
root> mysql -u root -p -e 'ALTER TABLE otrs.customer_company ADD vat VARCHAR (50)'PostgreSQL (from the
/opt/otrsdirectory):otrs> psql -c 'ALTER TABLE customer_company ADD COLUMN vat varchar(50)' -
Copy the
$Self->{CustomerCompany}section fromKernel/Config/Defaults.pmintoKernel/Config.pm. -
Add the new column to the
Maparray.[ 'CustomerCompanyVAT', 'VAT Number', 'vat', 0, 1, 'var', '', 0 ],
-
Add the new field to the customer create and update screen.
Relevant system configurations:
-
Forms###AgentFrontend::CustomerCompanyCreate::Properties -
Forms###AgentFrontend::CustomerCompanyUpdate::Properties
-
Note
It is recommended to always use English words for names.
See also
Names can be translated into other languages with custom language files. For more information, see the Custom Language File chapter.

