This feature enables the execution of different custom actions over ticket attachments. These actions could come from modules such as the ScanWithVirusTotal module or from web services that administrators can define in order to send attachment information to a third party system for analysis, process, count, etc.
In order to send the attachment information to a third party server it might be needed to be extracted or transformed from the OTRS format to a format that the other system can understand. Also the response from the other system needs to be converted to a special format in order to be processed and recorded by the attachment actions. This data format change or transformation can be done by using the mapping modules in OTRS generic interface, especially the XSLT mapping module should be capable to accomplish this task.
Setup VirusTotal Module
The system already comes with a module to send attachments to be checked by VirusTotal via upload of the attachment. The attachment action associated to this module is not enabled by default.
To activate the virus scan module:
-
Go to the VirusTotal website and create an account.
-
Find and copy the API key provided by VirusTotal to use their web services.
-
Add the API key to the
AttachmentAction::ScanWithVirusTotal::APIKeysetting. -
Enable the VirusTotal attachment action in the Attachment Action Management screen (see below).
Note
More module based attachment actions might be added later to STORM.
Create Web Services
Attachment actions can also use web services instead of predefined modules. This let the administrator to integrate their actions with remote servers as needed using XSLT mappings to transform data outbound and inbound.
Attachment actions should use the invoker Ticket::AttachmentAction as it prevents to send other attachments in the request and it also knows how to handle the results. This invoker comes with STORM.
After the inbound mapping the invoker should provide the key <AttachmentActionResult> with the following sub keys:
<Status>-
A number from 1 to 6. The list of status codes and proposed usage are the following:
-
1(Alert): Currently not in use (color purple). -
2(Critical): Used for internal server errors (color purple). -
3(Error): Execution errors (color red). -
4(Warning): Execution was correct but external errors reported (color orange). -
5(Notice): Execution was correct but results are not present or represent minor issues (color yellow). -
6(Info): Everything is fine (color green).
-
<Result>-
A string to be displayed as a tool tip.
<Details>-
Full result details in plain text format.
The web services can be created in the Web Services module of the administrator interface. The usage of this management screen is identical with the usage of the web service management screen of the OTRS framework.
Here is an example for XSLT mapping:
<xsl:stylesheet version="1.0" xmlns:xsl="http://www.w3.org/1999/XSL/Transform">
    <xsl:template match="/">
        <xsl:copy>
            <RootElement>
                <AttachmentActionResult>
                    <Status>5</Status>
                    <Result>Web service sampple result</Result>
                    <Details>This is an example</Details>
                </AttachmentActionResult>\r\n
            </RootElement>
        </xsl:copy>
    </xsl:template>
</xsl:stylesheet>"
Manage Attachment Actions
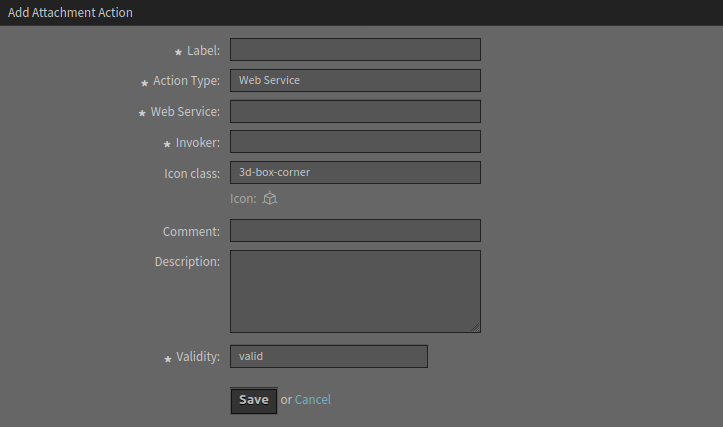
After the web service was created by the administrator, it is necessary to create a new attachment action where the web service name has to be set and the invoker from the drop-down list has to be selected. There is a new module to manage the attachment actions. The attachment actions management screen is available in the Attachment Actions module of the Ticket Settings group in the administrator interface.

To add a web service as attachment action:
-
Click on the Add Attachment Action button in the left sidebar.
-
Fill in the required fields.
-
Click on the Save button.

It is possible to create attachment actions for modules or web services. Two modules ScanWithVirusTotal and ReportWithVirusTotal are shipped with STORM, while new web services can be defined by the administrators.
Warning
Attachment actions can not be deleted from the system. They can only be deactivated by setting the Validity option to invalid or invalid-temporarily.
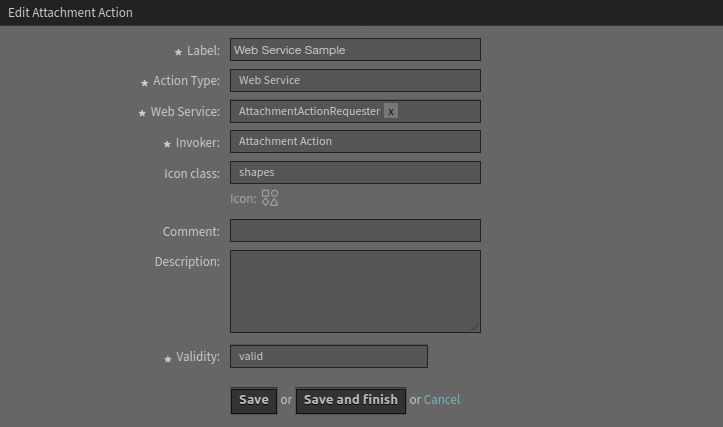
To edit an attachment action:
-
Click on an attachment action in the list of attachment actions.
-
Modify the fields.
-
Click on the Save or Save and finish button.

Usage
The attachment actions can be used in any attachment widget of the detail views.
To use the attachment actions:
-
Create a new ticket.
-
Fill in the required fields.
-
Add some attachments.
-
Go to the ticket detail view and find the Attachments widget.
-
Any attachment action has an own column in the Attachments widget.

The icons displayed in the widget is the same as set up for the action in the administrator interface. The color of the icons has been explained above.
Note
A column will be added for each attachment action. Try to define as many attachment actions as really needed, otherwise the widget might not fit in small screens.
Attachment Actions for VirusTotal
STORM provides two built-in attachment actions using the web service API from virustotal.com. These actions and their results are shown as separate columns in the Attachments widget.

The icons within the columns are used to perform the attachment action and to display the results of the analysis.
Virus Scan
The Virus Scan column is used to send an attachment to VirusTotal for virus scanning. In this case the file is sent to VirusTotal and VirusTotal returns a result after analysis whether this file contains a virus.
The results of this analysis are represented by the color of the icon. The colors have the following meaning:
-
Green = No virus found
-
Yellow = The file has been analyzed, but there are no results yet
-
Orange = The file contains a virus
-
Purple = Server error
-
Gray = The file has not been analyzed yet
Virus Report
In some cases, it may be necessary, instead of sending an attachment directly to remote virus services, to send a hash of the data of this attachment, which will be used as an identifier by VirusTotal.
For this purpose STORM has a function that allows to send a hash instead of the attachment itself. This function is represented with a separate icon in the Virus Report column. If an agent clicks on this icon, only the data hash of this file will be sent to VirusTotal instead of the file itself.
VirusTotal searches this hash in their records and returns the information whether this file contains a virus. The results of this analysis are represented by the color of the icon. The colors have the following meaning:
-
Green = No virus found
-
Yellow = The file has been analyzed, but there are no results yet
-
Orange = The file contains a virus
-
Red = The hash was sent but VirusTotal has no file to compare with
-
Purple = Server error
-
Gray = The file has not been sent

