When working with customers, resource planning and scheduling can be a complex task. Appointments enable you to meet your customers where and whenever needed.
OTRS supports this requirement with calendars. Calendars allow management of appointments and resources inside the ticket system. You can connect your tickets to scheduled tasks and make them available to all users to see. This feature adds transparency to show your teams workload and prevent users from promising resources which are not available.
Use this screen to manage calendars in the system. A fresh OTRS installation contains no calendars by default. The calendar management screen is available in the Calendars module of the Administration group.

Manage Calendars
To add a new calendar:
-
Click on the Add Calendar button in the left sidebar.
-
Fill in the required fields.
-
Click on the Save button.

Warning
Calendars can not be deleted from the system. They can only be deactivated by setting the Validity option to invalid or invalid-temporarily.
Warning
The maximum number of 50 valid calendars should not be exceeded. Exceeding this limit may affect the system performance.
To edit a calendar:
-
Click on a calendar in the list of calendars.
-
Modify the fields.
-
Click on the Save or Save and finish button.

To export a calendar:
-
Click on the export icon in the list of calendars.
-
Choose a location in your computer to save the
Export_Calendar_CalendarName.ymlfile.
To import calendars:
-
Click on the Browse… button in the left sidebar.
-
Select a previously exported
.ymlfile. -
Click on the Overwrite existing entities checkbox, if you would like to overwrite the existing calendars.
-
Click on the Import Calendar button.
Note
If several calendars are added to the system, use the filter box to find a particular calendar by just typing the name to filter.
Calendar Settings
The following settings are available when adding or editing this resource. The fields marked with an asterisk are mandatory.
General Calendar Settings
- Calendar name *
-
The name of this resource. Any type of characters can be entered to this field including uppercase letters and spaces. The name will be displayed in the overview table.
- Color *
-
The calendar color that will be displayed in the calendar overview screens.
To change the calendar color, just select a new color from the color palette. You can chose from the pre-selected colors or define other colors by choosing it from the color selector or typing the hexadecimal value.
- Permission group *
-
Select which Groups can access the calendar.
Depending on the group field, the system will allow users the access to the calendar according to their permission level.
-
Read only: users can see and export all appointments in the calendar.
-
Move into: users can modify appointments in the calendar, but without changing the calendar selection.
-
Create: users can create and delete appointments in the calendar.
-
Read/write: users can manage the calendar itself.
-
- Validity *
-
Set the validity of this resource. Each resource can be used in OTRS only, if this field is set to valid. Setting this field to invalid or invalid-temporarily will disable the use of the resource.
Calendar Ticket Appointments
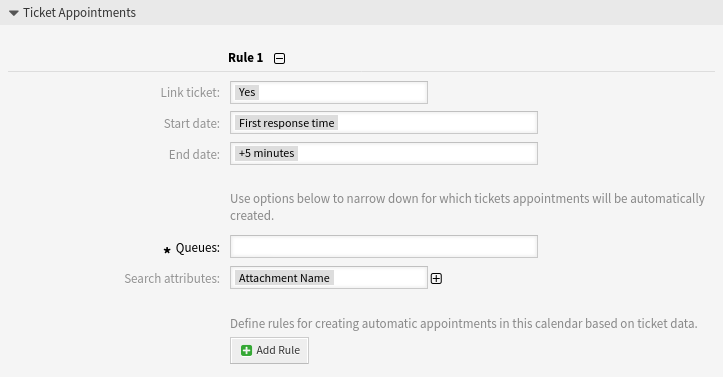
Define rules for creating automatic appointments in this calendar based on ticket data. To add a new rule, click on the Add Rule button.

- Link ticket
-
If set to Yes, a clickable link to the ticket will be displayed in the title of the appointment and the created appointment will be linked to the ticket. If set to No, the ticket number will be displayed as plain text in the title of the appointment and the appointment will not be linked to the ticket.
- Start date
-
Select a start date for the ticket appointment.
- End date
-
Select the end date for the ticket appointment.
- Queues *
-
Select one or more queues to narrow down for which tickets appointments will be automatically created.
- Search attributes
-
Additional search attributes can be added for further filtering by selecting an attribute and clicking on the ⊞ button.
By default, these events can trigger an update of a calendar appointment:
-
TicketSLAUpdate -
TicketQueueUpdate -
TicketStateUpdate -
TicketCreate -
ArticleCreate -
TicketPendingTimeUpdate -
TicketDynamicFieldUpdate_.*
Import Appointments
If at least one calendar have been added to the system, it is possible to import some appointments into the calendar.
To import some appointments:
-
Click on the Import Appointments button in the left sidebar.
-
Upload an iCal file and select a calendar.
-
Click on the Import appointments button.

- Upload *
-
Click on the Browse… button, and select a valid iCal (
.ics) file to upload. - Calendar *
-
Select an available calendar.
Note
If desired calendar is not listed here, please make sure that you have at least create permissions.
- Update existing appointments?
-
If checked, all existing appointments in the calendar with same
UniqueIDwill be overwritten.

