
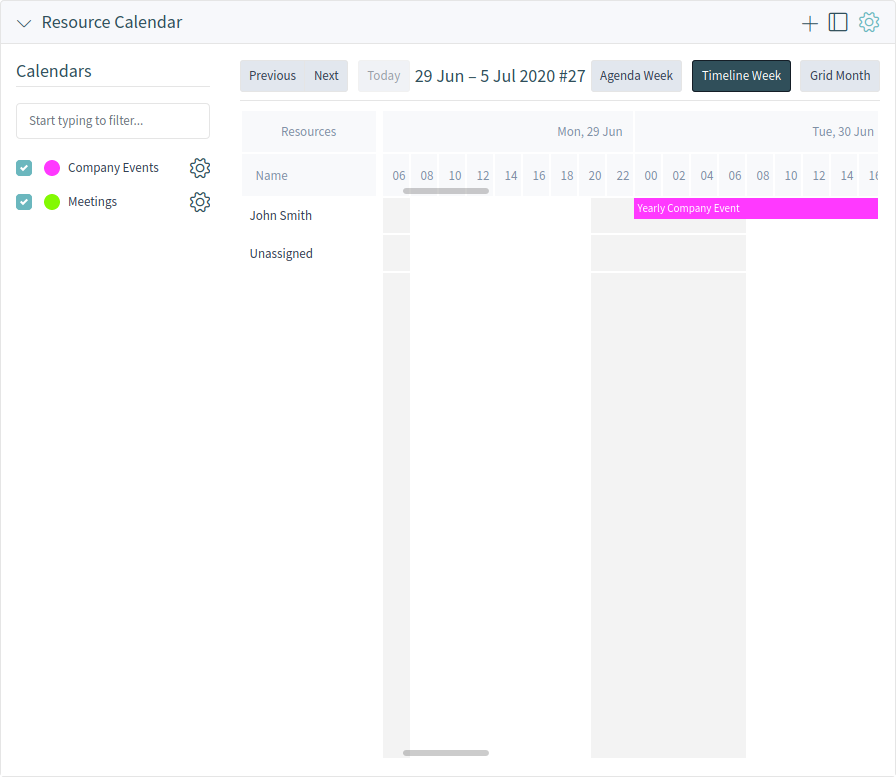
After installation of the package, a new resource overview widget will be available in the Calendar Overview and in the Dashboard. While it is possible to assign resources to an appointment in any appointment widget, this widget is designed exclusively for allocating resources to appointments.
This widget looks very much like a regular appointments widget. It has a filter for teams in the widget configuration and a list of agents for that team (available only in time-line views). By choosing a team in the widget configuration, you will be presented with all appointments assigned to the team. A new section Timeline View “Custom” Settings is also added to all appointment widgets as a new customizable view.
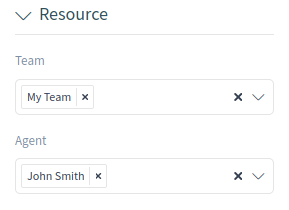
Once you have both teams and their agents set up, you can proceed to a calendar overview and start assigning appointments to teams and agents. Simply add or edit an appointment, and choose both team and agent from the lists under resource. You can do this via any appointment widget, as appointment edit dialog is the same for all of them.
By simply dragging an appointment to a row line with an agent’s name in time-line view, it is possible to assign an appointment to this resource. If an appointment does not have an agent assigned to it, it will appear in the Unassigned row of the widget. An appointment with multiple assigned agents will be displayed in each row of assigned agents. Dragging one instance of this appointment will move all them in the same fashion.
By editing the settings of the Resource Calendar widget via gear icon in top right corner, you can choose which team agents are displayed within the widget and you can customize the Timeline View “Custom” Settings.
In all other aspects, the Resource Calendar widget behaves in the same way as a regular appointment widget.
Calendar Widget Configuration
The widget configuration can be accessed via the gear icon in top right corner of any calendar widget.
Some of these settings have been applied also to the regular calendar overview.
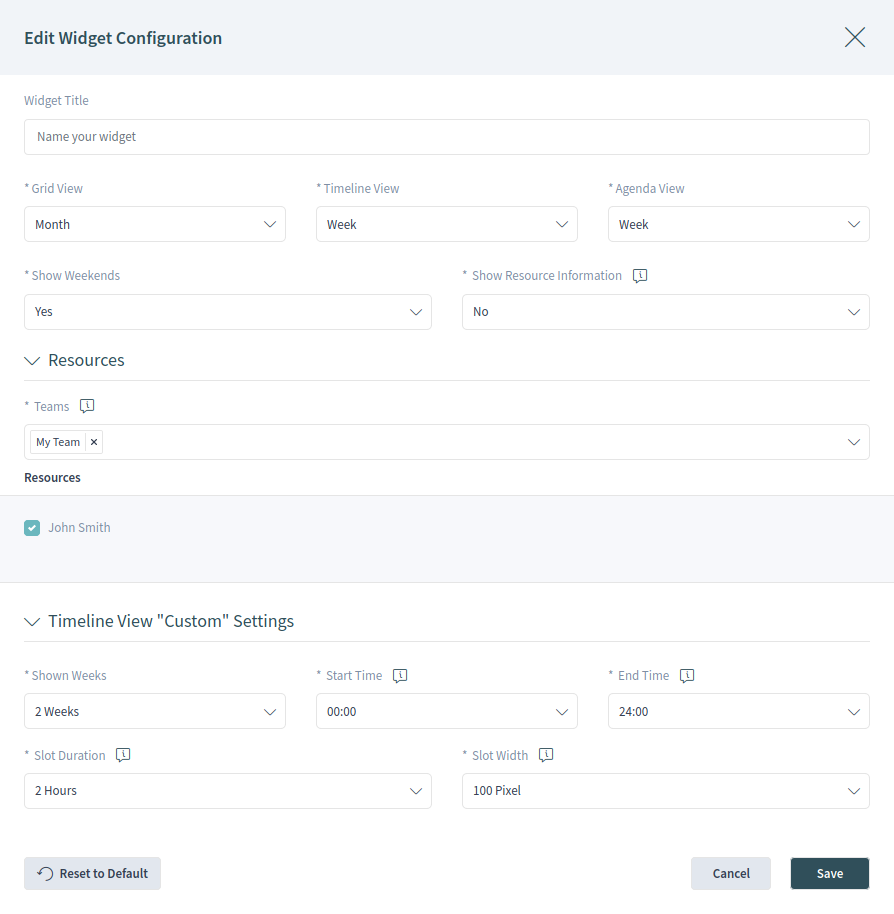
The following settings are available when adding or editing this resource. The fields marked with an asterisk are mandatory.
General
- Widget Title
-
Here, the default name of the widget can be changed. If a new name is entered, this name will be displayed in the header of the widget.
- Grid View *
-
Here you can select the time period for the grid view.
- Timeline View *
-
Here you can select the time period for the timeline view. You can also define a custom timeline view here. If you have selected the Custom timeline view, you can configure the settings for this timeline in the Timeline View “Custom” Settings section below.
- Agenda View *
-
Here you can select the time period for the agenda view.
- Show weekends *
-
Select whether the weekends should be displayed or not.
- Show Resource Information *
-
Show additional resource information next to the agent name in the Resource Calendar widget. You can use OTRS smart tags related to agents, e.g.
<OTRS_AGENT_X>. You can even access agent preferences.See also
The additional resource information can be added in setting
AppointmentCalendar::CustomTimeline::ResourceInformationin the system configuration.
Resources
- Teams *
-
This setting is user and team specific. If you have defined an agent filter in this way, the widget will filter the appointments to the selected teams and agents.
Timeline View “Custom” Settings
- Shown weeks *
-
Select how many weeks should be displayed in the Custom timeline view.
- Start time *
-
Select the start time for the Custom timeline view. The default 00:00 means the start time will be at the very beginning of the day (midnight).
- End time *
-
Select the end time for the Custom timeline view. The default 24:00 means the end time will be at the very end of the day (midnight).
- Slot duration *
-
Select the time slot duration for the Custom timeline view. The default 2 Hours means that each shown time slot has the duration of two hours (e.g. 12 slots are shown for a day 00:00 – 24:00).
- Slot width *
-
Select the time slot width for the Custom timeline view. The default 100 Pixel means that each shown time slot has a width of 100 pixel.
In Custom timeline view, it is possible to show more information on each shown appointment. For this, you have to configure the setting Additional Description in the Calendars screen.
Add Appointment
You can assign multiple teams and agents to a single appointment, but you must always choose a team first. Resulting list of agents is an aggregate of all selected teams, without any duplicates. Choosing an agent from the list is also optional, so you can leave an appointment assigned only to a team.
Calendar Subscriptions
It is possible to use a filter in calendar subscription feature.
To use the calendar subscription feature:
-
Open the Calendar Overview or the Dashboard screens.
-
Click on the gear icon next to a calendar in the Resource Calendar widget in left sidebar.
-
Select the teams and resources you want to filter for.
-
Click on the Copy button. Now the URL is copied to the clipboard.
-
Go to your calendar application and paste the URL.
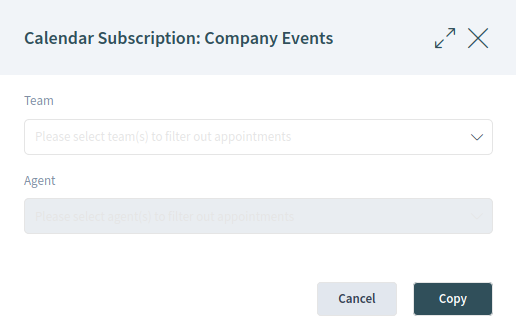
The dialog is kept open after clicking on Copy button, to be able to change the selected teams and resources.