
This feature allows you to manage several watchlists. A ticket agent defines watchlists and assigns tickets to a watchlist. Within the watchlist overview, the agent gets an overview of all of his watchlists and can administer them.
Note
The feature should be turned on with Ticket::Watchlist setting first. In order to restrict this feature to specific groups, verify the Ticket::WatchlistGroup setting in the system configuration. By default, all users will have access to this feature.
It is possible to customize the watch list notifications in the Ticket Notifications screen.
When the feature is enabled, the agent can perform the following actions.
- Define notification events for each watchlist
-
The agent is able to administer the following events which trigger an email notification to himself:
-
new article
-
change of customer
-
change of owner
-
change of queue
-
change of ticket status to a defined status
This email notification is independent of the notification preferences of the current owner of the ticket – unlike the standard subscribe/watchlist feature of OTRS.
-
- Assign a watchlist to another agent
-
A watchlist can be handed over to another agent. The list will disappear in the overview of the former owner and appear in the overview of the new owner. This feature is typically used to hand the list over to another agent when the original agent goes on vacation.
- Assign a deputy
-
One or more deputy agents can be assigned to a watchlist. A deputy then sees the new watchlist in his overview, and he is allowed to add or remove tickets to or from this watchlist. This feature is typically used to share a watchlist with colleagues to work on a ticket in a team.
- Export to CSV
-
The list can be exported to a CSV file, e. g. to process it in Excel.
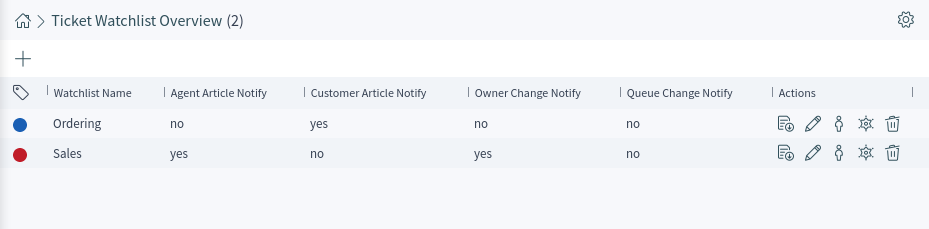
Use this screen to manage watchlists. The ticket watchlist overview screen is available from the organizer via the glasses icon.
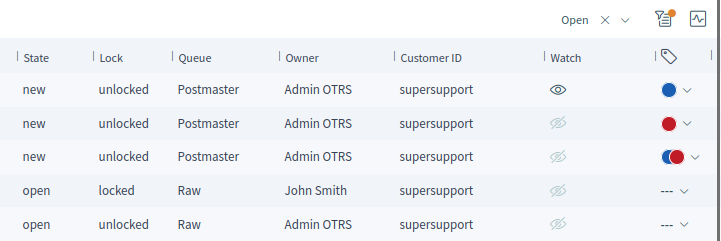
This screen is not designed for accessing tickets which are assigned to a ticket watchlist. To see all tickets which are assigned to a ticket watchlist, there is a new filter Watchlist available in all ticket lists.
Manage Watchlists
To add a watchlist:
-
Click on the plus icon in the breadcrumb bar.
-
Fill in the required field.
-
Click on the Save button.
To export the ticket list from a watchlist:
-
Click on the export button in the Actions column of a watchlist.
-
Select the export format.
-
Click on the Download File button.
-
Save the file somewhere in the file system.
To edit a watchlist:
-
Click on the edit button in the Actions column of a watchlist.
-
Modify the field.
-
Click on the Save button.
To change the watchlist owner:
-
Click on the person icon in the Actions column of a watchlist.
-
Select an agent from the list.
-
Click on the Save button.
Warning
The original owner agent will not have access to the watchlist anymore.
To assign deputies to a watchlist:
-
Click on the police badge icon in the Actions column of a watchlist.
-
Select deputy agents from the list.
-
Click on the Save button.
To delete a watchlist:
-
Click on the trash icon in the Actions column of a watchlist.
-
Click on the Yes button in the confirmation dialog.
Tickets can be added to the watchlist or removed from the watchlist in the Tickets screen.
Watchlist Settings
The following settings are available when adding or editing this resource. The fields marked with an asterisk are mandatory.
- Name *
-
The name of this resource. Any type of characters can be entered to this field including uppercase letters and spaces. The name will be displayed in the overview table.
- Color *
-
The color associated to the watchlist. This color will be displayed in the ticket detail view when a whatchlist is selected for the ticket.
- Notify On
-
Select the events that will trigger a notification.
- New Agent Article
-
Select, if the watchlist owner should be notified, when an agent adds a note to a ticket added to the watchlist.
- New Customer Article
-
Select, if the watchlist owner should be notified, when a customer user creates an article in the external interface.
- New Owner
-
Select, if the watchlist owner should be notified, when a ticket added to the watchlist has a new owner.
- New Queue
-
Select, if the watchlist owner should be notified, when a ticket added to the watchlist has been moved to an other queue.
- New State
-
Select, if the watchlist owner should be notified, when a state is changed for a ticket added to the watchlist.
- Target States
-
Notifications for status changes are only being sent if the new status matches the configured destination status.
If the New State notification above is selected, this field becomes mandatory.
Watchlist owners and their deputies can configure the notifications separately. The configuration of the destination status is only allowed for the watchlist owner and therefore also affects the deputies.
Notifications are not being sent to the agent who triggered the action.
See also
The content of the notifications can be edited in the ticket detail view when the ticket is assigned to a watchlist. See the Tickets chapter for more details.